What is Construction Residue?

How is a ‘Construction Clean’ different than a ‘Maintenance Clean’ in regards to your window cleaning service?


This article is being written in response to customer e-mails we receive like the one below.

“What do you mean, construction residue? I’m on the opposite side of the building, facing away from the construction (across the street from this strata), so it must be something else on my windows.”

The person in this example thinks we’re telling them that the construction site across the street is putting residue up into the air, which is then dirtying their windows more so than usual.

To correct this impression, let me state what we mean when we say we have found construction debris on the glazing.


During the construction of a strata building, a lot of materials can be required such as bricks, metal sheets, Stainless Steel Angle Iron, paints, metal chips, plastic sheet, etc. Though a lot of these materials might be consumed in the construction process, some of it tend to be discarded due to extra length, quality issues, broken parts, etc. This can be a major issue for builders and developers to get rid of the unused materials which can also be known as construction residue. So, as a lot of trash can be generated during the a construction process, it might often require dumpster rentals or other methods of removal. Besides all that debris, when the builder installs windows, in order to protect the surface of the glass from damage, in most cases, a blue plastic sheet is glued onto the outside surface. This reduces the number of scratches and construction material that ends up on the glass.

As the photo above demonstrates, by the time it is to be removed, the blue plastic doesn’t usually cover completely anymore. And, when it is peeled off and the windows cleaned, there is often more finishing work to be done in the building process; painting, caulking, sealing of concrete, etc.

At this point, the initial cleaning of the glass must be done before the developer turns the building over to the strata. This first clean is critical, as it must remove the glue that was used to adhere the blue plastic to the glass, as well as concrete spatter from glazing and frames, paint spatter, silicone, caulking, dirt and other gunk so that the strata will accept the building as it is turned over to them. This then releases the developer from its responsibilities.

Problem: this usually is done as the building is near completion, but usually not as the very final step. There are still trades working around the building finishing it up while this cleaning is going on. So even if the initial construction clean of the windows is done perfectly, more paint, silicone, caulking, glue, concrete and other such materials can get on the now unprotected glass in the weeks or even months before it is inspected and turned over.

But you would think that this would be noticed during the walk through inspection, right?

Not if several months have passed, and now the glass is covered in a layer of dirt. This hides the construction debris still on the glass.

Remember – this is a newly constructed building. There is dust being swept off balconies, landscapers putting down sod around the base, and all the other dust from drilling and sanding and finishing being washed down the sides of the building by the rain. The windows get dirty again fast. This dirt covers up whatever glue residue, calking, and silicone may remain on the windows.

If the building is accepted without a fresh window cleaning service being done just prior to the hand off, this will go unnoticed.

So, construction debris is materials left on the glass from the original construction of the building, that cannot be washed off with soap and water. This issue can remain hidden until the first regular maintenance window cleaning service is performed. Once the layer of regular old dirt is washed off, the stuff that remains behind is revealed.

You may wonder why this is an issue for the next window cleaners to remove. Here’s why:

Time. The quote for a maintenance clean was for labour time to clean all windows using soap and water or a tucker pole. The additional time it will take to remove construction materials is great; it may involve razoring, using chemicals, and going over each pane of glass several times to ensure this stuff is gone, rather than just once. It can increase the time needed to clean a single pane of glassfrom 45 seconds to up to ten minutes, or in bad cases, much more.

Tools. The specialized chemicals or equipment to address construction materials isn’t carried around by window cleaners when doing a maintenance clean. Using the chemicals required to do so (depending on what is actually on the glass) can require full rain gear and protective gear to ensure skin doesn’t get burned. (Muriatic acid to remove concrete spatter).

Access. In some instances, the reason why the construction material wasn’t properly cleaned off in the first place, is that the windows it is on are located in a difficult area to get to on the building.

There is one strata where we have discovered a lot of construction residue left on the top floor – an area where getting a person up to it using a lift is impossible due to the landscaping and building structure, and most glass needs to be cleaned by tucker pole. That means it was probably skipped during the initial clean, and the problem was left for the next person to come and clean the windows to try and deal with.

Understanding these issues is the first step in getting to a positive resolution between all parties. Otherwise, strata can be confused as to what is meant by construction residue and why this takes more time and is therefore more expensive to remove than regular environmental soiling removed during a regular maintenance clean. Tenants do not understand what is on the glass and why; all they see is a dirty ‘splotch’ that they expected would not be there after the window cleaning service. Hopefully this will help further understanding so that strata members know what is to be addressed, rather than just becoming frustrated when seeing that something remains on their glass. Extra time and attention may be needed and the cost for that, if caught in time, may be able to be charged back to the developer under warranty.

Ladder Stand-Off Use And Gutter Damage

False: If Ladder Stand Offs Are Not Used, Gutters Will Be Damaged.

(applies to cleaning gutters, windows,
and dryer vents)

If you are willing to take a moment to read the information below and peruse the photos provided, you will see my explanation regarding the common misconception that in order to avoid damage to buildings, a ladder must have standoffs at the head of it.

This is completely false. Here is why.

Damage is done to building facades or gutters through improper ladder use occurs in 1 of 2 ways.

1. Impact. This typically occurs when an in experienced technician is moving a ladder and either loses control, letting it fall against the building or gutters. A ladder should also never be bounced up and sideways to move it along the building. The weight combined with movement and speed cause dents and damage. This is avoided by having experienced professionals on staff who know how to handle the weight of a ladder properly. Note – this can happen with stand offs on the end of the ladder or not.

2. Angle. Too much pressure against a flimsy gutter can cause damage as well, but that pressure applied depends upon the ladder the angle is placed at. More on angle below.

When a ladder is put up against a building, a worker is leaning a large metal leaver against the building façade. Upon this lever he is placing a large amount of weight – his or her body weight. The amount of pressure against the building façade has to do with the angle of the lever. Whether the ladder has stand offs on the end of it or not is completely besides the point; a ladder with standoffs in the hands of an untrained or inexperienced worker can do just as much damage to the building façade if it is not used correctly. This is because all you have done is put a fancy end on the end of your lever. Rather than have two points of contact being the head of the ladder, you have two points of contact further spread out in the arms of the ladder stand offs. If this is improperly placed against the wall, gutter, or roof, then weight on the ladder or stand offs will cause damage.

When used correctly, a ladder takes most of the weight of the worker and this weight travels down through the length of the ladder and into the ground. A minimal amount of weight presses forward. The further one goes up the ladder, the further the weight on the ladder shifts, eventually putting more stress forward, but not enough to do damage. An experienced worker cleaning gutters or performing any other similar service, will increase the angle of the ladder if they know they are working right at the top of the ladder, thereby increasing the amount of weight going downward to the ground rather than forward against the building.

If used incorrectly, a ladder placed at too steep an angle pushes the ladder forward into the building. This can indeed cause damage, but it is also very likely to cause the feet of the ladder to slip out from under the worker, causing a fall.

ladder stand offs2

Why Use Ladder Stand Offs?

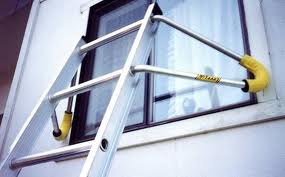
When a ladder is placed against a building and work is being done at the top of the ladder, a worker finds him or herself right up against the building. This creates a very awkward working situation, in which the worker often has to lean backward in order to perform whatever duties they are trying to do. The ladder stand offs allow the head of the ladder to stay about a foot away from the building façade, allowing them to do the work without having their cheek pressed into the building, or having them twist or turn awkwardly trying to do their job. For an example, see the picture below: if the fellow cleaning his windows had that ladder against the brick, he would be right up against the window, making his job quite awkward.

out from wall stand offs pic

Here’s another great use for ladder stand offs – they can allow you to work around windows you ordinarily couldn’t.

Ladder stand offs around window

Here is a scenario where stand offs can actually be a hazard. In the pic below, we can see an example of how it can be difficult to tell if the weight of the ladder is resting on the gutter, or on the stand offs on the roof.

on roof

If you give an inexperienced worker stand offs and tell them this will protect the gutters, and they then put the angle of the ladder too steep, the point where the ladder crosses over the gutter can and will take the weight of the worker as they climb up the ladder. Damage can be done, once again based on ladder angle. Thinking that the stand offs will take all the weight can lead to scenarios where a steeper angle is used, but the ladder is actually resting on the gutter not the stand offs.

My preference: have an experienced worker perform the service who knows how to use ladders correctly with or without stand offs, and knows how to ensure no damage is done either way. If a homeowner wants to use stand offs to protect their gutters, that makes more sense to me – they don’t climb ladders full time for a living, and may not know or be comfortable with placing ladder on the correct angles, moving a ladder without potentially dropping it, etc.

Q?: But there’s all these great pictures and opinions on the internet about how stand offs protect gutters! Moe, you must be wrong. How do you know?

I performed gutter cleaning, siding cleaning, and window cleaning for years in the field before taking a position as an account manager for Servus Group. I know from firsthand experience what I’m talking about. Am I arguing against ladder stand offs? No, not necessarily. Like any tool, they must be used properly to do the job that they are designed for, and they are not a 1 step solution to a challenge. If used incorrectly, they can actually cause damage to the roof, building siding, or gutter system.

Having ladder stand offs doesn’t mean damage can’t or won’t be done to a building or its gutter system – and inversely, not having them on doesn’t mean damage must have been done. The difference is in the skill and experience of the worker.

At Servus Groupl, we have very experienced technicians in the field, with our two lead ladder workers having 18+ and 12+ years respectively. All of our workers are trained, experienced, and care; that’s how we make sure no damage is done during the performance of our services.

Dryer Vent Cleaning – One Easy Change Can Fix A Lot Of Issues

Dryer Vents. They can be a fire hazard, they can cause water to leak into the ceiling creating thousands of dollars in damage; they can be a real maintenance issue. If one of your buildings is having repeated issues with their vents, our quick tip of the day may help solve the problem:

Look at the physical vent cover at the outside point of the dryer duct. What do you see? If the wrong type of vent cover is installed – change them. This can prevent a lot of issues developing over time.

We are finding that there is one style of a dryer vent that outperforms all other choices. When speaking to a local manufacturer, they told us builders often place orders for vents without acknowledging that the dryer vent cover ought to be different from other vents. So, we often find problems that occur when the wrong style of vent gets installed. These vents get clogged quite easily by a build-up of lint and ultimately cause a reduction or stoppage of airflow, which further damages the machine. This is when you’ll need to call a dryer vent cleaning service professional to handle it before the issue gets out of hand.

Why would a builder put on the wrong kind of vent? Ignorance. Cost savings (buying all the same style in bulk might save them money). A mix up with construction subtrades. The reason could be any or all of the above. Whatever the cause, we are seeing this issue a lot in the GVRD. Vent covers are put on backwards, the wrong style of cover is put on, etc.

As a business owner, periodically looking for dryer vent cleaning franchise opportunities could be a prudent choice that you would be contributing to your business space. So, what should you look for? What is the correct style?

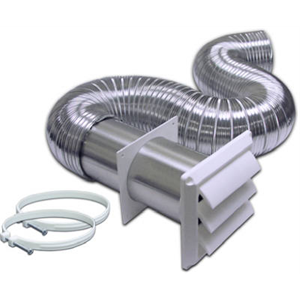
The best dryer vent cover is one that has a simple flap. It opens when hot air forces it to when the dryer is turned on. When the dryer is off, those flaps close.

We’ll call this “Style A”.

The gaps between the flaps offer enough room for the air to carry lint out. These are the best type of vent cover to have.

“Style B”

Vent covers with flaps and plastic mesh over top are not properly designed to be used for dryer vents! Those that are marketed and sold as dryer vent covers are doing the public a disservice. The plastic mesh grid clogs up with lint, and then the flaps underneath cannot open. Also, the professional tooling used to clean dryer vents in the majority of cases cannot fit into the tiny holes of the grid.

We spoke to a local vent manufacturer. They explained that the dryer vent covers that they make have a flap but no plastic mesh grid. Those with grids can be used for bathroom fans and other purposes. They related when they sell vent covers for dryers, if they run out of the style that have flaps but no mesh, they cut the mesh off dryer vents that have both, turning vents of Style B, into Style A.

“Style C” pic.

Those vent covers with very thin gaps are not designed for dryer vents. They easily clog when the slightest amount of lint builds up behind them. We have replaced this type of cover with proper vent covers on several buildings and find this significantly improves the effectiveness of the dryer, of the cleaning services, and reduces issues in the building – which can save thousands in damages when you consider moisture build up in the ceiling or fires caused by these clogged airways.

The other issue with these thin vent covers is that they’re often put on backwards, forcing the lint filled air onto a window below. So, not only is the vent cover not doing its job properly, it is also making the windows dirtier.

Good air flow is the key component with dryer venting. Restricting the ability of air to flow out with a tiny mesh screen at the very end which easily clogs with lint: bad idea.

The proper dryer vent cover should work ideally in 99% of cases. The other styles cause issues almost all the time.

Here is a video of one of our technicians and what he found on a site. You’ll see him clip the screen off, allowing the bent to ‘breathe’, and function as it should in future.

[wpvideo 9y0gCvKf]

So if one of your stratas is struggling with dryer vent cleaning issues, take a look at what they have installed at the exit point of the dryer vent duct, and determine if that is a major contributing cause. If so, replace the dryer vent covers. You’ll save a lot of money in the long run.

Gutter Guard / Leaf Guard: To Use or Not To Use?

A customer recently asked my opinion about gutter guard (also known as leaf guard). I was happy to provide it, and I think that having previously worked for a company that used to install it, and having cleaned gutters around the GVRD that both have it and don’t, I think I have an informed opinion.

Gutter guard is a big investment for a strata, and the idea is that is should save them on maintenance and save them money long term. Is that actually the case?

Answer: it might cost MORE in maintenance, depending upon the type of leaf guard installed. Or, it may save a bit of money, but in almost all case it does not work as expected.

Gutter guard is supposed to prevent leaves from sitting in your gutter while allowing the water pass through perforations, into the trough, and then be carried away as desired. This is great in theory, the problem is that it ALMOST NEVER works that way!

The worst kind of gutter guard I’ve seen yet was a plastic lattice work or netting that was supposed to sit over the top of the gutter. However, this net sank into the gutter under the weight of the leaves, and the perforations were so large, that it trapped the leaves in them. The result: leaves that couldn’t be cleaned out of the gutter! This was a disastrous, worst case scenario, and certainly cost more than a regualr gutter cleaning. The leaves were held tight like fish in a net, unable to be removed, choking up the gutter system. The only way to get rid of the junk was to remove the netting, which should have been disposed of along with the leaves. I don’t remember what actually ended up happening in that case.

The best designed product is one that I used to install. It is a flat, perforated aluminum that clips onto one side of the gutter, and is fastened down to the other side with screws. Durable, solid, with holes not too large, this looks like the perfect solution. Leaves can’t fit in the holes, water can seep in, it should work perfectly, right?

Wrong.

I’m glad I don’t install this product any more, now that I work with Servus Group.

This is Vancouver. We get a lot of leaves falling, and a lot of rain. What happens ot those dead leaves when they’ve been soaked by a day of heavy rainfall? They start to decompose, they compress under their own weight, and become a sticky, thick pasty mess kind of like paper mache. Paper mache, as we all know, sticks to things. What do leaves do that are thick and pasty? They stick to the roof. They stick to the top of the gutter guard.

That is the flaw in the whole scheme. The dead leaves sit on top of the gutter guard, plug up the holes, and the water now runs off the roof, over the leaves, and falls over the edge of the gutter to the ground. That is the scenario gutters are installed to avoid in the first place.

What’s wrong with this picture?

Well, the idea is that the leaves are supposed to be blown off the roof by the wind, and harmlessly swept up off the ground. The missing part of this formula? Vancouver rain. Not enough wind. The leaves stay on top the gutter guard, which now needs to get cleaned anyway. So, a maintenance service still has to be done. A ladder has to be set up to the roof, all the leaves swept off or peeled off. You might think, well, that sounds easier than scooping them out of the gutter, right?

Not necessarily. We’re not talking yet about pine trees. Those little needles that they shed are small enough to get through the little holes. Rotting leaves sitting atop the gutter guard break apart and send particles down through the holes. Over time, these things accumulate in the gutter and cause problems. However, now you can’t get into the gutter trough to clean them out – there’s a cover screwed down over your gutter. Now the gutter guard acts as a lid preventing that stuff from being removed.

So, what I’ve found in the industry is that gutter guard, which is often a very expensive investment for stratas, is not really worth it. Why put a perforated lid on system that is going to need cleaning out anyway? The expectation that it will eliminate the need for maintenance is also false. You still have to have someone get up there and sweep off the top of the gutter guard and sweep leaves off the roof.

This has been my experience, anyway.

I’d love to hear feedback from anyone else out there who has had either positive or negative experiences about gutter guard. Leave a comment. Start a discussion. Are there things that I’ve missed here?

Thanks for reading e-tips!


Carpet Maintenance Programs – We Didn’t Design Them, The Manufacturers Did

Whenever someone is held liable for the condition of their product, they are going to give the purchaser the specs on maintaining it in order to keep it in optimium condition.  That way, if the product is not used properly and the purchasers comes back for a refund, the argument can be made: why didn’t you take care of it properly?  After all, someone who manufactures a product and sells it doesn’t want to go around giving money back to purchasers for something that was misused, not maintained appropriately, and therefore broke down due to neglect.  After all, if I had my way I’d only change the oil in my car every 200,000 kms, but that would have consequences.

Our carpet cleaning programs are designed based on manufacturers’ warranty requirements.   These steps are necessary to protect and maintain your carpet so that it is kept in optimal condition.   This is based on fact, not any one person’s personal opinion or experience, but on the research, testing and results of numerous companies over decades of this product being created and sold.

WHAT DO THE MANUFACTURERS SAY?

There are key elements to carpet cleaning wherever there is HIGH TRAFFIC.  This is key – we’re not talking about the carpet on the bottom of your living room closet, or the spare room where Auntie Frieda and Uncle George go once per year but is otherwise unused, we’re talking about HIGH TRAFFIC AREAS: carpet that gets walked on every day by multiple pairs of dirty feet.    This is the lobby areas of buildings, the stairwells, the hallways.  They take a beating, and need to be cared for in order to ensure the best lifespan of the product.

The warranty requirements have 5 mandatory elements:

1) Entrance Mats : reduce the amount of dirt tracked in.  Use them.  It’s in the warranty requirements because they work and make a significant difference.

2) Vacuuming: get that abrasive soil out before it cuts and scrapes the carpet fibers under the grinding action of footsteps.   Everyone knows to vaccum but are you doing it properly?  Are you doing it enough?

3) Spot Cleaning: get that stuff out of there before it sets permanently!  And not any 1 spot cleaner is good for every type of spot.  Use the right product, don’t bleach the carpet fibers, and don’t set the stain permenantly by using the wrong thing.

4) Interim Maintenance : this can take several forms, but is a required step for high traffic areas in carpet – lighter than a hot water extraction clean, but heavier than vacuuming.

5) Hot Water Extraction: this is the most recognized form of carpet cleaning, also known as steam cleaning or restorative cleaning.  It is a necessary step, but not the only step – look at all the other steps that come before it.

Keep your warranty valid.  Maintain your investment.  Keep your strata clean.  That’s the goal and we’re on your side to achieve that result.  Don’t let the situation get extremely bad, then try to tidy it up a year later with a hot water extraction clean, expecting that it can and will every time be able to correct a cumulative year’s worth of neglect.  That approach doesn’t work.  It’s proven not to work.  If it did, that’s what would be outlined in your warranty.  But it’s not.

Carpet Maintenance Programs Designed By Manufacturers

Whenever someone is held liable for the condition of their product, they are going to give the purchaser the specs on maintaining it in order to keep it in optimium condition.  That way, if the product is not used properly and the purchasers comes back for a refund, the arguement can be made: why didn’t you take care of it properly?  After all, someone who manufactures a product and sells it doesn’t want to go around giving money back to purchasers for something that was misused, not maintained appropriately, and therefore broke down due to neglect.  After all, if I had my way I’d only change the oil in my car every 200,000 kms, but that would have consequences.

Our carpet cleaning programs are designed based on manufacturers’ warranty requirements.   These steps are necessary to protect and maintain your carpet so that it is kept in optimal condition.   This is based on fact, not any one person’s personal opinion or experience, but on the research, testing and results of numerous companies over decades of this product being created and sold.

WHAT DO THE MANUFACTURERS SAY?

There are key elements to carpet cleaning wherever there is HIGH TRAFFIC.  This is key – we’re not talking about the carpet on the bottom of your living room closet, or the spare room where Auntie Frieda and Uncle George go once per year but is otherwise unused, we’re talking about HIGH TRAFFIC AREAS: carpet that gets walked on every day by multiple pairs of dirty feet.    This is the lobby areas of buildings, the stairwells, the hallways.  They take a beating, and need to be cared for in order to ensure the best lifespan of the product.

The warranty requirements have 5 mandatory elements:

1) Entrance Mats : reduce the amount of dirt tracked in.  Use them.  It’s in the warranty requirements because they work and make a significant difference.

2) Vacuuming: get that abrasive soil out before it cuts and scrapes the carpet fibers under the grinding action of footsteps.   Everyone knows to vaccum but are you doing it properly?  Are you doing it enough?

3) Spot Cleaning: get that stuff out of there before it sets permanently!  And not any 1 spot cleaner is good for every type of spot.  Use the right product, don’t bleach the carpet fibers, and don’t set the stain permenantly by using the wrong thing.

4) Interim Maintenance : this can take several forms, but is a required step for high traffic areas in carpet – lighter than a hot water extraction clean, but heavier than vacuuming.

5) Hot Water Extraction: this is the most recognized form of carpet cleaning, also known as steam cleaning or restorative cleaning.  It is a necessary step, but not the only step – look at all the other steps that come before it.

Keep your warranty valid.  Maintain your investment.  Keep your strata clean.  That’s the goal and we’re on your side to achieve that result.  Don’t let the situation get extremely bad, then try to tidy it up a year later with a hot water extraction clean, expecting that it can and will every time be able to correct a cumulative year’s worth of neglect.  That approach doesn’t work.  It’s proven not to work.  If it did, that’s what would be outlined in your warranty.  But it’s not.

Really? They Don’t Believe in Programs?

A Message From David Benoit

In my 12+ years of working with property managers and building owners I have found the most effective property managers have their properties on some form of plan or program.  As you know there can be quite a turnover of property managers in the industry; they can get overwhelmed by having to respond to  buildings’ needs.

Looking back from this point the managers that are still in the industry are generally proactive in their approach.  This is a “Win-Win” for all parties involved.  The buildings get attention, the property manager can spend their time leading the buildings and the contractor will provide more competitive pricing.

Over the years the 1 most common objection I hear from property managers is, “the strata doesn’t believe in programs.”  My response to this is, “really?”  They don’t believe in cleaning their carpets, gutters, windows etc?  That tells me that the strata members would prefer to own in a building where they can’t see out their windows, where their gutters overflow and their carpets are disgusting and wearing out.

I think the truth is the strata’s haven’t thought it through and the property manager didn’t spend the time needed communicating to them the benefits of an overall plan. You can have 3 to 4 different contractors, but the key here is one calendar of when items will occur and by whom.

On a side note, the most successful property managers I know have only 2 trades they work with in each category.  This helps them stay on top of things and these contractors will do their absolute best to ensure that their customer’s buildings are taken care of with the fear of losing all of the work at that property manager’s buildings. Well run strata’s don’t use the council president’s nephew to clean the carpets.

I have never understood why buildings need to gather quotes every year for services that are generally done every year.  Does the strata think the pricing is going to come down?  If they did their due diligence in the initial process then why would that change?  Of course, if a contractor did not perform according to expectations or agreement, that’s a different story.  The truth is that most contractors will not raise prices on a yearly basis if the work is committed to and ongoing.  At Servus Group, we have carpet maintenance programs that are 10 years old and the pricing is still the same.  However when asked to quote on a yearly basis pricing generally trends upward. If we have a relationship with a building and our crews are familiar with the project we are grateful for the work and don’t see the need to raise pricing.

So in summary if you want to have a less stressful longer career make a plan for your buildings maintenance, my recommendation based on over a decade of experience and relationships with hundreds of property managers: only deal with a few trades and take the time to educate your stratas and building owners on the benefits for everyone of being proactive, having a plan, and maintaining your strata buildings.

Thanks for your time and consideration,

David Benoit